
This post is part of a tutorial for deploying a basic website with monitoring and analytics without using Docker or containers. The introductory post gives an overview of the tutorial.
In the previous post, we configured our Droplet on Digital Ocean. Now that we have our Droplet up and running we need to configure DNS for our domain and install software that will help us serve our website to users under a recognizable name (our domain name).
In this post, we will be:
- Configuring DNS for our domain so visitors are routed to our Droplet
- Installing Nginx
- Adjusting our Firewall to handle website traffic
- Creating an Nginx configuration file for our website
- Deploying a production build of our website to the Droplet
Configuring DNS
In order to configure DNS for our domain, you will need a domain name. If you already have one to use for this tutorial, great! If not, you can acquire one from your favorite domain registrar. I tend to use domains.google, but have also used namecheap in the past. Digital Ocean is not a domain name registrar, but they do offer a DNS hosting service that we will be using.
NOTE: Keep in mind, there's more than one way to complete this part of setting up a domain. We'll be leveraging Digital Ocean as much as we can in this tutorial, but there are other ways of setting up DNS. Use whichever you prefer.
After acquiring your domain we want to add a Domain to our Digital Ocean account. This will allow us to manage records for the domain within Digital Ocean (e.g., A, AAAA, CNAME records). In the Manage sidebar section on the Digital Ocean page, click Networking.
You should now see a page that allows you to Add a domain. Add the domain you acquired earlier. For example, if the domain you acquired was frannsoft.com you would enter 'frannsoft.com', no quotes. Next, click Add Domain.
Your Domain entry will be created and you should be taken to a page showcasing records for this domain. By default, three NS records will be automatically created, pointing to Digital Ocean's nameservers. You should also see a Create new Record section:

Let's add one more record for now. We will add an A record which will provide Digital Ocean's Nameservers with an IP Address for our domain. In the Hostname input field, enter @. This means your root domain name will be used (e.g., example.com).
Next, click in the Will Direct To input field. In the list of Droplets that appears, select the one created for this tutorial. This is how we specify where the request should go. The TTL should be defaulted to 3600, which is fine. Click the Create Record button and you should see a new A entry in the DNS records section of the page. Your root domain should be listed with the IP address of your Droplet.
Now that we have configured our Domain on Digital Ocean we need to make sure our DNS is correct on the domain registrar for our domain. Digital Ocean has a guide that offers walkthroughs on pointing to Digital Ocean Nameservers from some of the more popular Domain Registrars. If you're using domains.google you simply need to do the following:
- Click the
DNSsidebar option for your domain in domains.google - Click the
Use custom name serversoption in theName serverspane - Enter Digital Ocean's nameservers in the input fields. These can be found in the Digital Ocean networking overview
And DNS configuration is complete. One important thing to keep in mind is that DNS changes can take a while to propogate. This can be a bit confusing as you might have made these changes and moved forward with the rest of your site configuration only to hit DNS resolution issues down the line. You can track DNS change propogation through sites like dnschecker.org (I am not affiliated with them). There are definitely other sites that perform the same checks. I would recommend waiting until your DNS changes have been propogated in your region before moving forward, just to help avoid any issues once we're ready to test our website later on in the tutorial.
That being said, we're done configuring DNS!
Opening ports for web traffic
Next, we'll be installing and configuring Nginx so our site is actually served to users upon request.
Jump back to our Droplet and switch to the user webadmin we created earlier:
su webadmin
To install Nginx we'll run the following commands:
sudo apt update
sudo apt install nginx
This is the first time we're using apt so updating our packages to have the most recent listings is a good idea. The second command will install Nginx on our Droplet. After installing Nginx we need to update our firewalls so that common web traffic ports are allowed. Nginx has a few profiles that are compatible with ufw for doing this. To see the profile run the command:
sudo ufw app list
Four application profiles should be listed:
- Nginx Full
- Nginx HTTP
- Nginx HTTPS
- OpenSSH
We have already added the OpenSSH profile. Now we want to add the Nginx Full profile via the command:
sudo ufw allow 'Nginx Full'
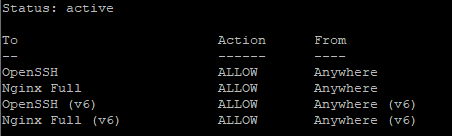
This opens ports 80 and 443. To confirm the expected ports were opened you can run the command:
sudo ufw status
You should see the following:
Now we check to see if Nginx is running:
sudo systemctl status nginx
You should see a response with nginx.service and and Active property that is set to active (running).
Another way we can test if Nginx is working is to hit our Droplet's IP address from our browser on our local machine. Example: http://[droplet IP address]. You should see a page stating:
Welcome to nginx!
If so, nginx is now running! Hit CTRL+C to exit the output in our terminal session from our previous command.
We have nginx running, but it has no configuration details about our website yet. We will configure that next.
Nginx configuration for our site
Nginx uses configuration files sometimes called conf files. These files typically house information such as:
- The server name of the site. In our case this is the domain name
- How to respond to requests for specific file types (e.g., images, javascript files, html files, etc)
- How to respond to requests for specific endpoints (e.g., /admin, /home, etc)
- SSL certificate information
- gzip configuration
…And more. We'll be setting up a few of these in the conf file for our website.
First, navigate to /etc/nginx/sites-available. Create a new file with a name the same as your domain. For example, if the domain you've been working with so far is example.com, the conf file would be named example.com. If you are using a subdomain the file would be named something like mysubdomain.example.com.
Technically, this naming convention is not required by Nginx, but it helps keep our files informative without needing to open them to look through the contents as much. If you're configuring multiple sites on the same Droplet, the naming of these files gets even more important to help keep things clear. You can also split these files up to avoid repeat configuration blocks when multiple sites use the same configuration.
To create the file run:
sudo nano yourdomain
This will open nano with your new file. In the file we want add a few basic items for now (we'll add more later).
A server block is an Nginx term for a group that uses the configured server_name and listen directives to bind to tcp sockets on the machine. Here's what the file contents should look like for now:
server {
    # We will add https support in just a bit.
    # For now, this will support http.
    listen 80;

    # Use your domain here.
    # This is what Nginx will use when attempting to find
    # the configuration for the incoming user's request.
    server_name yourdomain;

    # Use your domain here.
    # This is the root directory Nginx will serve data when responding to requests.
    root /var/www/html/yourdomain;

    # If the client is request just the root domain 'e.g., example.com',
    # serve the index.html page for the site.
    location / {
        try_files $uri $uri/ /index.html;
    }

    # We do not want to cache the index.html file for our React Single-Page Application.
    # If we do, when we update the site, users might still
    # see old info and links of they have a stale cache.
    # More info here - https://www.nginx.com/blog/nginx-caching-guide/
    location /index.html {
        add_header Cache-Control 'no-store, no-cache';
    }

    # gzip configuration. We want to compress our responses.
    gzip on;
    gzip_types text/plain text/css application/json application/javascript;
}
Once you have added that to the file save the contents and exit the file.
Finally, we'll create a symbolic link from this file to the sites-enabled directory. The sites-enabled directory is the directory Nginx uses as a 'live sites' folder which Nginx reads on start. We want to avoid having to duplicate our physical conf file so a symbolic link is useful here. To create the symbolic link run the command:
sudo ln -s /etc/nginx/sites-available/[your conf file] /etc/nginx/sites-enabled/
You can now test that your configuration is correct in Nginx with the command:
sudo nginx -t
This will report any errors with your configuration. If there are no problems, you can now restart Nginx so it will load your changes:
sudo systemctl restart nginx
Creating the physical directory for our site
Now we will create the folder where our website will be physically deployed. This should match the root value we specified in our Nginx conf file above. Change to /var/www/html:
cd /var/www/html
Create a new directory that will contain our website contents using your domain instead of the example one given below:
sudo mkdir yourdomain
Lastly, change the owner of the directory we just created to the webadmin user:
sudo chown webadmin:webdamin your-folder-name
Deploying our website to our Droplet
It's time to push our website to our Droplet! In this section we will be:
- Building a production version of our site locally
- Pushing it to our Droplet at the
rootlocation in ourconffile
If you are not using create-react-app these steps might be slightly different for you. The end result is the same, however. Get the production website files to the root location in our conf file for our website on our Droplet.
To create a production build of our create-react-app project we'll run the command:
npm run build
You should now see a build directory in your local project structure. The contents of this folder are what we want to copy to our Droplet.
In order to copy files from our local machine to our Droplet we'll use SFTP. I'm on Windows and will be using WinSCP to do this, but you can accomplish it using any SFTP client you like. Digital Ocean also has a guide to do this entirely within the terminal if that suits your needs better. If you are using WinSCP they have a guide to configuring SSH key usage.
Next, we can copy the contents of the build folder on our local machine to the root folder we just created on our Droplet. Take everything inside the build folder.
Now, if we hit our domain again from our local browser we should see our website!
Our site is now up and running. Let's configure SSL so that the site can be accessed via HTTPS.
We'll do that in part 4.