
This post is part of a tutorial for deploying a basic website with monitoring and analytics without using Docker or containers. The introductory post gives an overview of the tutorial.
In the previous post, we setup our website using this repository. If you want, you should be able to follow these posts using your own website. Just know the setup on our web server might differ slightly if you do so.
Now we want to configure our web server. Here is what we want to have configured by the end of this post:
- Digital Ocean \$5 (for a full month's use) Droplet
- Nginx
- An Nginx configuration file for our website
- The domain for our website pointing to Digital Ocean nameservers
Keep in mind This will create a Droplet that will charge your account a maximum of \$5/month. Charges for the Droplet will stop accruing if you Destroy the Droplet. For more info, check the Digital Ocean pricing FAQ.
Also Keep in mind - If you would like, Digital Ocean offers a referral program. Use my this referral link to create your account and Digital Ocean will give you get \$50 in credit over 30 days if you add a valid payment method with your Digital Ocean account (ah yes, the catch). More details on their referral program can be found on their site.
First off, we'll create a \$5 Digital Ocean Droplet. I like using Digital Ocean because UX for maintaining these Droplets is super easy to use, the prices are good for the specs on what you buy and they have all the features I've wanted for my projects so far. It's personal preference, of course. There are other great platforms that offer a similar featureset.
Go ahead and create a Digital Ocean account. Once done and logged into your account you may need to a create a Project:
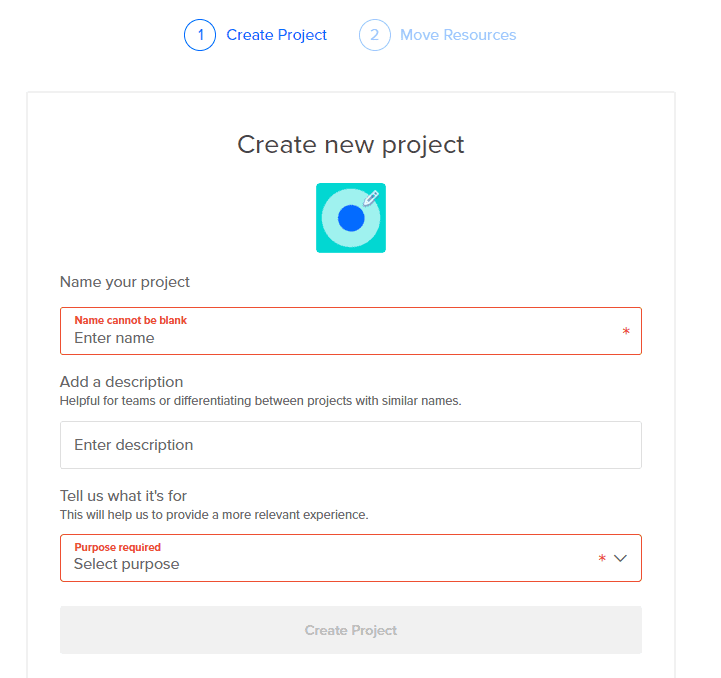
Add any Name and purpose and then click Create Project. You should be taken to the 'home page' for that Project. A Project is like a grouping of resources in Digital Ocean.
In the upper right corner of the page you should see a green Create button. Go ahead and click that, then select Droplets and you should be taken to a page with a header of Create Droplets. Here is where we'll configure our machine.
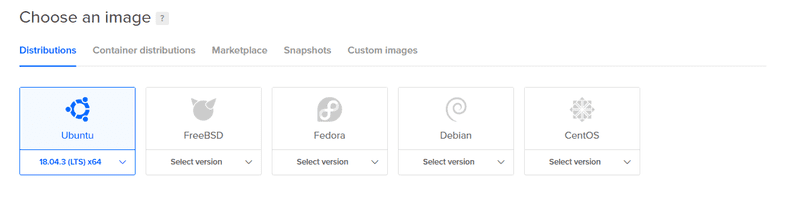
In the Choose an Image section we want to choose an Ubuntu 18.04.3 (LTS) x64 image. At the time of writing, this is the latest available version of Ubuntu. Feel free to take a later version if available:
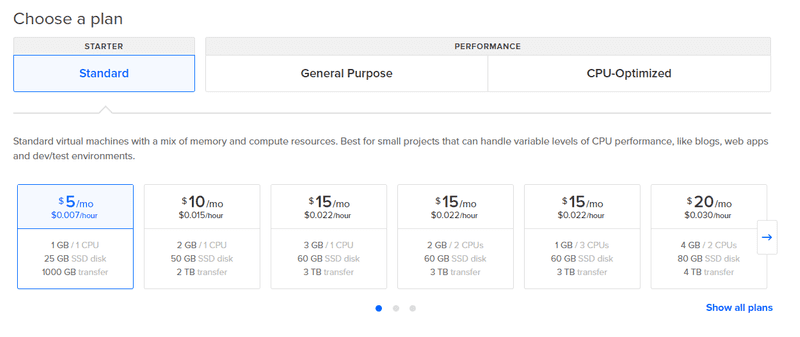 Our plan will be the
 Standard plan. After selecting the Standard option under the Starter Plan section, click the arrows to move to the left so you can see the $5/mo option:

For the Choose a datacenter region choose the region that you think the majority of your visitors will reside. I usually just default to either New York or San Francisco since the majority of my projects see visitors in the United States. Choosing a subregion number is just fine-tuning your region selection. For our example app it's fine to leave this at the pre-selected option. For me, this is New York and 1.
Next is Additional Options. Check the Monitoring box. This will come into play later, once our website is up and running. Checking this box will add in a monitoring agent to our Droplet, letting it communicate cpu usage, memory usage, metrics collection and few other system stats back to Digital Ocean, allowing us to easily configure alerts on those stats.
Authentication
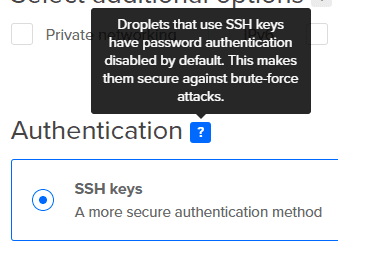
For the Authentication section, choose SSH and add your Key. Clicking the New Key button will bring up a helpful dialog to walk you through creating a Key if you're less familiar with SSH. After adding your SSH Key content and clicking the Add SSH Key in the dialog on the screen you should see your Key added on the Droplet configuration page we've been working with so far.
It's important to note that by using an SSH key while configuring our Droplet, Digital Ocean will configure our Droplet to not allow logins via password (only by SSH key).
You can see a bit more info on this by hovering of the ? next to the 'Authentication' section header:
Almost done!
Now you'll see a section dedicated to some final steps in our configuration.
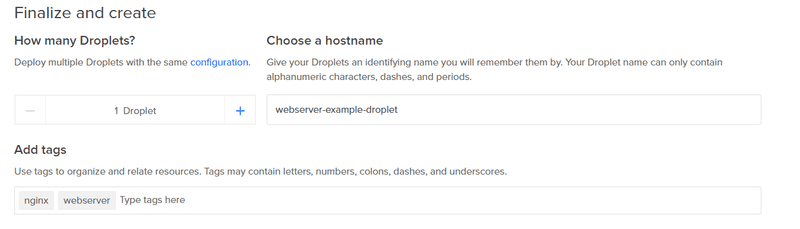
How many Droplets? We just need 1
Choose a hostname? This is not our domain hostname or our website name. This is the name of the Droplet itself according to Digital Ocean. The default generated name will consist of some our Droplet's current configuration. If this works for you, great! Otherwise, feel free to name it what you find to be most helpful. Digital Ocean will show you your configuration for each Droplet even if you use a name here that doesn't contain that info.
Add tags: Here you can add tags to help categorize and/or organize your Droplet. We'll add nginx and web server, but feel free to add your own.
Select Project: We'll just assign our Droplet to the Project we created earlier.
Here's an example of this portion of the Droplet configuration:
Add backups: Since this is just an example Droplet we won't enable any backups.
Keep in mind - This will create a Droplet that will charge your account a maximum of \$5/month. Charges for the Droplet will stop accruing if you Destroy the Droplet. For more info, check the Digital Ocean pricing FAQ.
Now you can click the green Create Droplet button and Digital Ocean will get to work! Navigating to the Project we assigned our Droplet to should show our new Droplet in the list of Droplets for the Project. If you click on the Droplet you'll be taken to details about that Droplet including taking manual backups, adjusting configuration details and/or destroying the Droplet.
Let's SSH into the terminal. If you're newer to SSH, Digital Ocean provides a nice tutorial on How to Connect to your Droplet with OpenSSH. I'm on Windows and tend to use PuTTY. Digital Ocean provides a guide on How to Connect to your Droplet with PuTTY on Windows.
After connecting, you can login as root. We'll now create a new user and perform the rest of our tasks on the Droplet using that user.
Creating a User
This can be done with the following command: adduser [your new username]. Ours will be adduser webadmin. You can populate the Full Name, Room Number info you want, but we'll just leave it blank.
Next, we want to grant administrative privileges to this user so they can perform admin tasks when necessary without us needing to switch back and forth to root.
This can be done with the following command: usermod -aG sudo webadmin. Now, we can perform actions with superuser privileges when we enter the password for this user and prefix our commands with sudo.
Switch to the user:
su webadmin
Let's create an SSH Key for this user. This will allow us to SSH in as this user so we do not have to login as root. We can then disable root access even via SSH.
For creating and configuring the SSH Key for our webadmin user I recommend following Step 4 (using 'Option 2') of this Digital Ocean tutorial. If you're on Windows like me and using PuTTY to login to your Droplet they have a guide to using their SSH key generator.
Disabling root access
We no longer need to login as root to be able to get into our Droplet so we can disable the ability to login as root as a security measure.
NOTE: Doing this will disable root access. If you have misconfigured your access for the webadmin user we created above you might lock yourself out of your Droplet. It's a good idea to test that you can SSH into the Droplet with your webadmin user prior to doing this.
To do this, we will modify the sshd_config file to not allow root login:
sudo nano /etc/ssh/sshd_config
Will open this file. Around line 32 there should be:
PermitRootLogin yes
Change this line to:
PermitRootLogin no
Lastly, we need to restart the ssh service in order for our changes to take effect:
sudo service ssh restart
Great, our server is a bit more secure now with regards to access.
Firewall configuration
Now let's setup basic Firewall rules. On our Droplet, we will be using ufw and we want to allow SSH connections.
First, enable ufw with the command sudo ufw enable. You should receive a response stating Firewall is active and enabled on system startup.
Second, add the OpenSSH profile. This will add common OpenSSH settings to our Firewall and make it less tedious for us to set these up ourselves. This is done using the command sudo ufw allow OpenSSH. You should see a response of:
Rule added
Rule added (v6)
Now enter the command sudo ufw status. You should see the following:
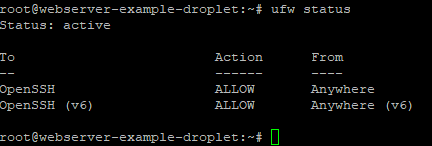
If you do, great! Basic configuration of our server is complete!
Configuring Email Alerts for Droplet Usage
When we checked the Monitoring box earlier, our Droplet was created with the Digital Ocean monitoring agent already installed and configured. It's important to be notified when your Droplet might soon run out of resources or is running under heavy usage for unexpectedly long amounts of time. Digital Ocean allows us to create Alert Policies and integrate those alert notifications with email or Slack In this tutorial we will choose to use Email.
On the Digital Ocean page that lists your Droplets, click on the Droplet you are using for this tutorial and in the center you should see blue text stating Create Alert Policy. Go ahead and click that and you will be taken to a page like this:

Here is where we can configure the specific metrics we want to watch and the threshold we consider worthy of an alert. For now, select Memory Utilization, is above, 70 (percent) and 5 min. This means we will get an alert if the Memory utilization remains above 70% for 5 consecutive minutes.
In the next section, select the Droplet you are using for this tutorial.
Then, in the Send alerts via section, select the checkbox that displays your email address. This is the email address Digital Ocean will send alerts to when necessary.
Finally, you can name your alert policy if you would like. After that, click the Create alert policy button. Done! Alerts are now setup. Feel free to add others if you would like.
Next, we will be installing and configuring tooling more specific to serving up our website.
Onward to Part 3!